Friday, November 30, 2012

Squash Arancini -Samuel

Arancini! Basically a fancy name for fried balls made of your favorite risotto. It's very very simple, but pretty awesome to eat. This will be my shortest post because I didn't take as many pictures. :)


Pumpkin Arancini with Sweet and Sour Bell Beppers
# of servings: 6 balls
Time spent: 5 minutes in addition to your risotto time
Ingredients:

  • 2 cup Risotto (makes about 3 balls)
  • AP Flour to coat
  • 2 eggs
  • 1/2 cup bread crumbs to coat
  • Few sprigs Parsley
  • 1 bell pepper (or 1/2 red, 1/2 orange)
  • Drizzle white wine vinegar

Directions:
1. You've already made your risotto. If you haven't, check out this Parmesan Squash Risotto recipe for help. Rub your hands in some cooking oil and start making the balls. A lot of people put a chunk of cheese in the middle, but I didn't have any ones that would melt and stick well so I didn't. Coat first in flour, then egg, then bread crumbs. The flour and eggs form an adhesive mixture that the bread crumbs can stick onto. No need to salt since your risotto should already be salted.
2. Heat up frying oil in a pan, making sure that the oil is at least covering the bottom and is very hot. You'll notice I only used a little oil, but using more oil will also make the arancini look more tasty and beautiful. Fry until golden.

3. Slice your bell peppers and fry with olive oil, and drizzle white wine vinegar near the end of the cooking process. If you've put too much vinegar, put in some sugar. Make sure to season as you go.

4. Garnish with parsley and you're done. :)

Saturday, November 24, 2012

Bell Pepper Stuffed Chicken Thigh -Samuel

Stuffing meat! It's another way to innovate in preparing meat, and it's so incredibly versatile. You can stuff if with some veggies, rice, fruit, and even other meats!

Here's an incredibly simple one with roasted red peppers. :)

Roast Pepper Stuffed Chicken Thigh
# of servings:  1 per thigh
Cost: ~$3
Time Spent: ~1 hour
Ingredients:

  • 3 Chicken Legs/Thighs
  • 1 Bell Pepper
  • Small bunch fresh flat leaf parsley
  • 2 thinly-sliced Cloves Garlic
  • 1 Lemon (for zest)
  • -optional- De-glaze of your choice (white wine, balsamic/sherry vinegar, stock, etc)
Directions:
1. Heat oven to 425 and put in your roast pepper and roast for at least 15 minutes, turning as needed. Then leave to cool in the refrigerator for 10 minutes so it's easier to peel, then peel off all the skin. You CAN do this beforehand, but if you're doing this recipe now, do not turn off the oven, instead drop it to 400.
2. While the peppers cool, remove the bone from your chicken leg or thigh. You can do this by cutting around the bone and removing as much meat as you can from the bone while keeping the entire thing whole. If you've never done this before, start out with a thigh, because it's much easier.
3. Season the thigh/leg with salt and pepper, and then fill with roast red pepper strips, few slices garlic, parsley, and your lemon zest.
Try with different things. This one is some leftover squash risotto. :)
4. Roll and seal with toothpicks so they don't break open. Then sear them off with a nice hot pan to a beautiful color.
5. After they're seared, put in the oven for a good 10-15 minutes, turning as needed. Check by poking the meat and seeing if the juices run red, or if you're unsure, just slice through the thickest part of it.
All done! Feel free to de-glaze the pan with your favorite vinegar, spirit/wine, or stock. Wait at least 10 minutes to slice them and make sure to slice them thickly enough or they'll get cold fast. Happy eating. :)

Saturday, November 17, 2012

Parmesan Squash Risotto -Samuel

Hey! Sorry I haven't posted in over two months. I didn't stop cooking, but I'd decided that taking pictures of food wasn't worth it because I'm such an inept photographer that I have to take a dozen pictures before I get something mediocre. Who knows, maybe I'm starting to see that there's some use in pictures after all.

Ah, risotto. What I love and what I hate. I love it because I love rice-based dishes that are actually incorporated into the dish itself (not just smothered below a layer of sauce). I hate it because it's a fairly temperamental dish that keeps wanting attention. But this Parmesan Squash Risotto is perfect for winter because squashes are at their maximum flavor (and cheap!), and it's a hearty dish that warms you from the inside out. I do wish that I had pumpkin because the color of a ripe pumpkin is beautiful, but squashes are lovely as well.


Parmesan Squash Risotto
# of servings: 4
Cost: ~$8 ($2 a person!)
Time spent: ~1hr 40 min (1hr 10 min just to prep the squash!)
Ingredients:

  • 1.5 cup Arborio Rice (for entree portion, 1 cup for appetizer)
  • 1 medium shallot
  • 4 cloves garlic
  • ~2.5 cups chicken stock
  • 1 medium size squash (I used one kabocha)
  • 1 cup grated parmesan
  • 1 cup tightly packed fresh spinach
  • 2 tbs butter

 Directions:
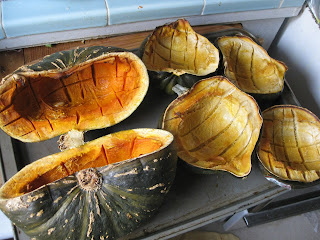
1. Preheat your oven to 400F. Start off by cutting your squashes in half. Season with salt and pepper and olive oil. You could choose to use some aromatics here but I like to put them in later in case the flavor is too strong. Roast for a good 60 minutes.

2. After you're done roasting, put your chicken stock in a pot and warm it up. The stock should be hot so the pan doesn't lose heat when we add it in. Also scoop out the flesh of the squash and blend it with a little bit of milk or cream. You'll get an amazing squash puree, but don't puree all of it. Keep a few chunks that you can add into your risotto for a chunky bite.

3. Dice your shallot (small dice) as well as your cloves of garlic. Sweat them off in the pan with some olive oil on a medium flame and make sure to season. DO NOT color them.


3. When your shallots are sweated, add in your arborio rice and saute them together for about a minute. You'll then pour one ladle of chicken stock in the pan until it just covers the rice, like you can see below. Continue to stir it, as it might start sticking on the bottom. The rice will absorb the stock fairly quickly, and you'll have to keep adding the stock as the rice absorbs it.

 4. You'll notice that arborio rice has tiny white dots in the middle of the rice. That is NOT supposed to disappear. If it does, you've overcooked it, and you'll probably have to use it for risotto balls or something. When you think that the rice is about 10 minutes away, add in a large ladle of your squash puree and mix it in. After five minutes, add in your chunks of squash that you didn't puree. Also add your parmesan and your spinach and keep stirring.

5. Now when you think it's about done, slice your butter thinly or into small chunks. Take your risotto pan off the heat and mix the butter in. You'll see that it makes the risotto incredibly creamy and gives it a nice shine.
That's it! Serve with some parmesan strips and fried sage leaves if you'd like. Trust me, it's delicious. You'll want to save it all for yourself instead of feeding it to others, but hopefully you won't. :)

Saturday, November 3, 2012

Garlic Herb Pull Apart Bread- Monica


Hey guys! A lot of my peer sisters were asking for the recipe for this bread which I made for Crystal's birthday. If you've ever heard of Monkey bread, this is like the savory version of it. It has a slight buttery herby taste to it and is great when you eat it straight out of the oven like we did. It is also easy to share it with a lot of other people because the bread looks like a lot of bread rolls stuck together and all you have to do is "pull apart" to eat, hence the name of the bread. This means no utensils necessary! Serve it with a side of marinara, tomato, or pizza sauce and A LOT of napkins. Enjoy :)

Garlic Herb Pull Apart Bread
Difficulty: Medium
Yields: One big loaf
Time: 1 hour prep, 2.5 hours for rising, 0.5 hours for baking

Special equipment:

  • One bundt pan (you can use a cake pan if you don't have one)

Ingredients:

  • 2 1/4 tsp. active dry yeast (one packet)
    • I used instant yeast instead. The difference is that instant yeast is a little more concentrated (so you can use about 25% less instant yeast) and it doesn't have to be activated in water. Doesn't make too much of a difference which one you use in my eyes.
  • 1 1/3 cups warm water
    • Not too hot or it will kill the yeast. Around 110 degrees Fahrenheit.
  • 2 tablespoons extra-virgin olive oil
  • 2 teaspoons salt
  • 3 1/2 cups all purpose (or bread) flour
  • 1/4 cups butter, melted
  • 1 1/2 tablespoons mixed herbs
    • I used parsley, rosemary, thyme, sage, and basil. Any mix will be fine.
  • 1/2 tsp. red pepper flakes
  • 2 cloves garlic minced (or 1 teaspoon garlic powder)
  • A dash of pepper
  • 1/4 cup grated Parmesan cheese
Directions:
  1. In a large mixing bowl, stir together the yeast and water. Let sit for 5-10 min until yeast is foamy.
  2. Mix in olive oil, salt, and flour. Knead for about 10 min. until dough is smooth and elastic.
  3. Transfer dough to a lightly oiled bowl, cover with a damp towel, and let sit to rise for 1.5-2 hours or until the dough has doubled in size.
  4. Meanwhile, in a small bowl, combine melted butter, herbs, minced garlic, and red pepper flakes.
  5. When the dough has risen, punch it down. Tear of small pieces of the dough, roll into a ball, and coat in the butter mixture. Place the small rolls on the bottom of the bundt pan until you have one layer of dough balls.
  6. Sprinkle 1/2 of the Parmesan cheese on top.
  7. Continue layering the dough balls and cheese until you have used all the dough. Finish by sprinkling cheese on top.
  8. Cover the pan and let sit until dough has doubled in size again, about 30 min.
  9. Preheat oven to 350 degrees F (175 degrees C).
  10. Bake for 25-30 min. or until the bread is golden brown.
  11. Serve with a side of hot marinara, tomato, or pizza sauce. 
  12. Pull apart and eat!