Friday, November 30, 2012

Squash Arancini -Samuel

Arancini! Basically a fancy name for fried balls made of your favorite risotto. It's very very simple, but pretty awesome to eat. This will be my shortest post because I didn't take as many pictures. :)


Pumpkin Arancini with Sweet and Sour Bell Beppers
# of servings: 6 balls
Time spent: 5 minutes in addition to your risotto time
Ingredients:

  • 2 cup Risotto (makes about 3 balls)
  • AP Flour to coat
  • 2 eggs
  • 1/2 cup bread crumbs to coat
  • Few sprigs Parsley
  • 1 bell pepper (or 1/2 red, 1/2 orange)
  • Drizzle white wine vinegar

Directions:
1. You've already made your risotto. If you haven't, check out this Parmesan Squash Risotto recipe for help. Rub your hands in some cooking oil and start making the balls. A lot of people put a chunk of cheese in the middle, but I didn't have any ones that would melt and stick well so I didn't. Coat first in flour, then egg, then bread crumbs. The flour and eggs form an adhesive mixture that the bread crumbs can stick onto. No need to salt since your risotto should already be salted.
2. Heat up frying oil in a pan, making sure that the oil is at least covering the bottom and is very hot. You'll notice I only used a little oil, but using more oil will also make the arancini look more tasty and beautiful. Fry until golden.

3. Slice your bell peppers and fry with olive oil, and drizzle white wine vinegar near the end of the cooking process. If you've put too much vinegar, put in some sugar. Make sure to season as you go.

4. Garnish with parsley and you're done. :)

Saturday, November 24, 2012

Bell Pepper Stuffed Chicken Thigh -Samuel

Stuffing meat! It's another way to innovate in preparing meat, and it's so incredibly versatile. You can stuff if with some veggies, rice, fruit, and even other meats!

Here's an incredibly simple one with roasted red peppers. :)

Roast Pepper Stuffed Chicken Thigh
# of servings:  1 per thigh
Cost: ~$3
Time Spent: ~1 hour
Ingredients:

  • 3 Chicken Legs/Thighs
  • 1 Bell Pepper
  • Small bunch fresh flat leaf parsley
  • 2 thinly-sliced Cloves Garlic
  • 1 Lemon (for zest)
  • -optional- De-glaze of your choice (white wine, balsamic/sherry vinegar, stock, etc)
Directions:
1. Heat oven to 425 and put in your roast pepper and roast for at least 15 minutes, turning as needed. Then leave to cool in the refrigerator for 10 minutes so it's easier to peel, then peel off all the skin. You CAN do this beforehand, but if you're doing this recipe now, do not turn off the oven, instead drop it to 400.
2. While the peppers cool, remove the bone from your chicken leg or thigh. You can do this by cutting around the bone and removing as much meat as you can from the bone while keeping the entire thing whole. If you've never done this before, start out with a thigh, because it's much easier.
3. Season the thigh/leg with salt and pepper, and then fill with roast red pepper strips, few slices garlic, parsley, and your lemon zest.
Try with different things. This one is some leftover squash risotto. :)
4. Roll and seal with toothpicks so they don't break open. Then sear them off with a nice hot pan to a beautiful color.
5. After they're seared, put in the oven for a good 10-15 minutes, turning as needed. Check by poking the meat and seeing if the juices run red, or if you're unsure, just slice through the thickest part of it.
All done! Feel free to de-glaze the pan with your favorite vinegar, spirit/wine, or stock. Wait at least 10 minutes to slice them and make sure to slice them thickly enough or they'll get cold fast. Happy eating. :)

Saturday, November 17, 2012

Parmesan Squash Risotto -Samuel

Hey! Sorry I haven't posted in over two months. I didn't stop cooking, but I'd decided that taking pictures of food wasn't worth it because I'm such an inept photographer that I have to take a dozen pictures before I get something mediocre. Who knows, maybe I'm starting to see that there's some use in pictures after all.

Ah, risotto. What I love and what I hate. I love it because I love rice-based dishes that are actually incorporated into the dish itself (not just smothered below a layer of sauce). I hate it because it's a fairly temperamental dish that keeps wanting attention. But this Parmesan Squash Risotto is perfect for winter because squashes are at their maximum flavor (and cheap!), and it's a hearty dish that warms you from the inside out. I do wish that I had pumpkin because the color of a ripe pumpkin is beautiful, but squashes are lovely as well.


Parmesan Squash Risotto
# of servings: 4
Cost: ~$8 ($2 a person!)
Time spent: ~1hr 40 min (1hr 10 min just to prep the squash!)
Ingredients:

  • 1.5 cup Arborio Rice (for entree portion, 1 cup for appetizer)
  • 1 medium shallot
  • 4 cloves garlic
  • ~2.5 cups chicken stock
  • 1 medium size squash (I used one kabocha)
  • 1 cup grated parmesan
  • 1 cup tightly packed fresh spinach
  • 2 tbs butter

 Directions:
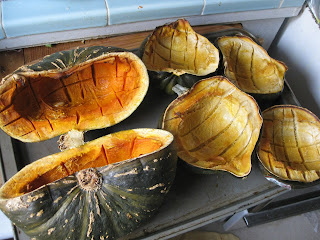
1. Preheat your oven to 400F. Start off by cutting your squashes in half. Season with salt and pepper and olive oil. You could choose to use some aromatics here but I like to put them in later in case the flavor is too strong. Roast for a good 60 minutes.

2. After you're done roasting, put your chicken stock in a pot and warm it up. The stock should be hot so the pan doesn't lose heat when we add it in. Also scoop out the flesh of the squash and blend it with a little bit of milk or cream. You'll get an amazing squash puree, but don't puree all of it. Keep a few chunks that you can add into your risotto for a chunky bite.

3. Dice your shallot (small dice) as well as your cloves of garlic. Sweat them off in the pan with some olive oil on a medium flame and make sure to season. DO NOT color them.


3. When your shallots are sweated, add in your arborio rice and saute them together for about a minute. You'll then pour one ladle of chicken stock in the pan until it just covers the rice, like you can see below. Continue to stir it, as it might start sticking on the bottom. The rice will absorb the stock fairly quickly, and you'll have to keep adding the stock as the rice absorbs it.

 4. You'll notice that arborio rice has tiny white dots in the middle of the rice. That is NOT supposed to disappear. If it does, you've overcooked it, and you'll probably have to use it for risotto balls or something. When you think that the rice is about 10 minutes away, add in a large ladle of your squash puree and mix it in. After five minutes, add in your chunks of squash that you didn't puree. Also add your parmesan and your spinach and keep stirring.

5. Now when you think it's about done, slice your butter thinly or into small chunks. Take your risotto pan off the heat and mix the butter in. You'll see that it makes the risotto incredibly creamy and gives it a nice shine.
That's it! Serve with some parmesan strips and fried sage leaves if you'd like. Trust me, it's delicious. You'll want to save it all for yourself instead of feeding it to others, but hopefully you won't. :)

Saturday, November 3, 2012

Garlic Herb Pull Apart Bread- Monica


Hey guys! A lot of my peer sisters were asking for the recipe for this bread which I made for Crystal's birthday. If you've ever heard of Monkey bread, this is like the savory version of it. It has a slight buttery herby taste to it and is great when you eat it straight out of the oven like we did. It is also easy to share it with a lot of other people because the bread looks like a lot of bread rolls stuck together and all you have to do is "pull apart" to eat, hence the name of the bread. This means no utensils necessary! Serve it with a side of marinara, tomato, or pizza sauce and A LOT of napkins. Enjoy :)

Garlic Herb Pull Apart Bread
Difficulty: Medium
Yields: One big loaf
Time: 1 hour prep, 2.5 hours for rising, 0.5 hours for baking

Special equipment:

  • One bundt pan (you can use a cake pan if you don't have one)

Ingredients:

  • 2 1/4 tsp. active dry yeast (one packet)
    • I used instant yeast instead. The difference is that instant yeast is a little more concentrated (so you can use about 25% less instant yeast) and it doesn't have to be activated in water. Doesn't make too much of a difference which one you use in my eyes.
  • 1 1/3 cups warm water
    • Not too hot or it will kill the yeast. Around 110 degrees Fahrenheit.
  • 2 tablespoons extra-virgin olive oil
  • 2 teaspoons salt
  • 3 1/2 cups all purpose (or bread) flour
  • 1/4 cups butter, melted
  • 1 1/2 tablespoons mixed herbs
    • I used parsley, rosemary, thyme, sage, and basil. Any mix will be fine.
  • 1/2 tsp. red pepper flakes
  • 2 cloves garlic minced (or 1 teaspoon garlic powder)
  • A dash of pepper
  • 1/4 cup grated Parmesan cheese
Directions:
  1. In a large mixing bowl, stir together the yeast and water. Let sit for 5-10 min until yeast is foamy.
  2. Mix in olive oil, salt, and flour. Knead for about 10 min. until dough is smooth and elastic.
  3. Transfer dough to a lightly oiled bowl, cover with a damp towel, and let sit to rise for 1.5-2 hours or until the dough has doubled in size.
  4. Meanwhile, in a small bowl, combine melted butter, herbs, minced garlic, and red pepper flakes.
  5. When the dough has risen, punch it down. Tear of small pieces of the dough, roll into a ball, and coat in the butter mixture. Place the small rolls on the bottom of the bundt pan until you have one layer of dough balls.
  6. Sprinkle 1/2 of the Parmesan cheese on top.
  7. Continue layering the dough balls and cheese until you have used all the dough. Finish by sprinkling cheese on top.
  8. Cover the pan and let sit until dough has doubled in size again, about 30 min.
  9. Preheat oven to 350 degrees F (175 degrees C).
  10. Bake for 25-30 min. or until the bread is golden brown.
  11. Serve with a side of hot marinara, tomato, or pizza sauce. 
  12. Pull apart and eat!


Tuesday, October 23, 2012

Pan Seared Salmon - Laura

Pan Seared Salmon
My roommate asked me to cook her a quick dinner the other day, so here it goes!   Fusion-y flavor-wise since I just used random things that I had...the most important part is cooking the fish right!     

Pan Seared Salmon
Difficulty: Easy-Medium 
Yields: 1 serving
Time: ~1 hour for marinating, ~20 minutes for everything else

Ingredients: 
1 salmon filet 
rosemary, thyme, oregano, or italian seasoning (to taste)
salt (to taste)
fresh ground pepper (to taste)
cooked rice
canola oil

Simple Marinade:
~2T sesame oil
~2T cooking wine (I used rice wine) 
~2T soy sauce
~1T red wine vinegar 
~2 tsp brown sugar
minced garlic 
green onions 

Process:

1. Make sure the salmon filet is dry by patting with paper towels, then season well with salt, desired seasoning (I used oregano and rosemary), and pepper to taste. Gently press seasoning into the fish. 


2.  In a deep plate or shallow bowl, mix together the ingredients for the marinade.  Place salmon in the marinade and refrigerate for 30 minutes.  After 30 minutes, flip the filet and marinate the other side for 30 minutes.  (can marinate longer, but I didn't have time)


3.  Put some canola oil in a medium pan and turn the heat up to just before "high."  When the pan is hot (you can test this by taking the salmon filet and barely putting a corner of it on it pan), place salmon in the pan. 

4. Cook in the pan until the color of the salmon changes to about 2/3 of the filet (so the bottom 2/3 should be a lighter pink, the top 1/3 should be the same color as the raw filet), then flip to the other side of the filet. Turn the heat down to medium and cook until the entire filet is a consistent color.


5. Sear the sides of the salmon by turning it on its side, and serve with rice when the fish is cooked through :)

Rotisserie Chicken Pasta Salad - Laura

Rotisserie Chicken Pasta Salad
Another easy dish from the potluck :) these measurements are very rubato because I forgot to measure :( 

Pasta Salad
Difficulty: Easy 
Yields: ~15 servings/a lot
Time: ~45 minutes

Ingredients: 
1 package spaghetti noodles 
shredded rotisserie chicken 
2 cucumbers, julienned
2 tomatoes, diced
6 T soy sauce, then to taste from there
3 T balsamic vinegar, then to taste from there
1 T sweet chili sauce (or to taste)
3 T sesame oil, then to taste from there
salt (to taste)
pepper (to taste)
2 green onions
2 T rice vinegar 
0.5 cups chicken broth

Optional: 
bell peppers
sautéed mushrooms 
baby spinach

Process:

1. Cook pasta as directly and drain.

2.  Chop green onions and divide into two portions.  Cook one portion in a bit of canola oil for a few minutes, then add chicken and chicken broth. Season to taste with salt and pepper, and cook for about 5 minutes. 


3.  Meanwhile, move drained pasta to a large bowl and combine with soy sauce, vinegars, chili sauce, and sesame oil.


4. Season with salt, pepper, and more soy sauce/vinegar/chili sauce/sesame oil to taste.  Add the other half of the green onions, cucumbers, tomatoes, and chicken.  Mix/toss.  


5.  Divide and serve :) 


Creamy, Nutmeggy Rice Pudding - Laura

Creamy, Nutmeggy Rice Pudding
Here's the recipe for the rice pudding that I brought to the sophomore/junior sisters potluck this past Saturday. Yeap, I just invented a new word. :)

Rice Pudding
Difficulty: Easy
Yields: 16 individual servings
Time: ~ 1 hour and 30 minutes

Ingredients: 
8 (half gallon) cups whole milk
4 eggs (beaten)
4 T butter
3 tsp vanilla
3 cups uncooked medium grain rice 
1.25-1.5 cups white sugar
1 tsp cinnamon, extra for garnish
1 nutmeg 
1 tsp salt 

Optional:
raisins  
chocolate chips for garnish

Process:
1. Bring 6 cups of water to a boil in a deep pan or medium pot and add rice and stir. Simmer for about 15-20 minutes (until rice is cooked), stirring occasionally to avoid rice sticking to the bottom. 


2. In a large pot or saucepan, combine 6 out of the 8 cups of milk, sugar, salt, cinnamon, nutmeg, and cooked rice.  Cook until creamy (about 20 minutes), stirring frequently (sticks to the bottom easily). 


3. Stir in remaining 2 cups of milk and beaten eggs (add raisins here, if using). Stir quickly so the eggs don't scramble.  Cook for about 5 more minutes, stirring constantly.

4. Remove pot from heat and stir in butter and vanilla. Divide into portions, garnish with cinnamon (to taste), and serve either warm or chilled.  


Easy Banana Bread - Laura

Easy Banana Bread
 

Okay I haven't posted in a really long time, so I'm just going to try to throw down some of the more recent things :) It's going to be really difficult ingredients-wise because I don't remember too far back...but I'll try:) 


We had some really gross, overripe bananas lying around, so my roomies decided that they wanted to eat them in the form of banana bread.  This one was really quick to make, and I decreased the amount of sugar since the bananas were really ripe.  Serve warm with peanut butter...! :) [sorry for the lack of pictures...use your imagination! hehe]

Easy Banana Bread
Difficulty: Easy
Yields: 1 loaf
Time: ~ 1 hour and 15 minutes

Ingredients: 
3 overripe bananas
2 cups all purpose flour
0.67 cup white or dark brown sugar (depending on how sweet you like things)
0.25 cup buttermilk* 
2 large eggs
0.5 tsp baking soda
2 tsp vanilla 
dash of salt
5 T melted butter 

Optional:
chocolate chips 
chopped walnuts or pecans
dash nutmeg (to taste)
dash cinnamon (to taste)

Note:
If you do not have buttermilk (I didn't have buttermilk when I made this last night :( ), here is a good substitution:

1 T white vinegar (or rice vinegar, which is a little sweeter and less acidic, but it also works)
milk

Put the tablespoon of vinegar into a cup, then fill up the rest of the cup to the top with milk. Let sit for 10 minutes and then use in the recipe :) 


Process:
1. Mash bananas in a bowl.  

2. Mix the dry ingredients together in a medium bowl and set aside.  

3. Add butter, eggs, vanilla, and buttermilk to the bananas and mix.  

4. Gently combine the two mixtures until they form a wet dough (do not over mix...just mix enough to incorporate). [Note: if using chocolate chips, walnuts, or other goodies, this is when you would mix them in:)] 

5.  Preheat the oven to 375° F. 

6.  Line a loaf pan with foil, grease the bottom, and pour in banana bread mixture.

7. Bake in the oven for about 50 minutes to an hour, or until you poke it with a toothpick/chopstick and it comes out clean. Cool, slice, and enjoy! :) 


Tuesday, September 25, 2012

Hummus - Monica


Hi guys! So... I'm trying to think of recipes that would be easy and convenient for college students to make and thought of this...
One of my favorite foods that pretty much goes with anything is hummus. It can be eaten in sandwiches, as a dip for chips, and in falafel sandwiches and is usually found in Mediterranean, Greek, and Middle Eastern cuisine. I would really encourage and recommend everyone to try to make their own hummus because it is tastier, healthier, and more cost-efficient than generic store brands. It is also VERY CUSTOMIZABLE because you can tweak the amount of each ingredient according to your taste. For example, some people like lemony hummus while some like the nuttier taste of the tahini. The amounts shown below are estimates because I don't usually measure my ingredients when I make it, but instead, I taste the hummus along the way and add anything I feel is missing. Enjoy! Hope you fall in love with hummus after this like I did :)

Hummus
Difficulty: Easy
Number of servings: ~one pint
Cost: ~$2
Time spent: 20 min.

Ingredients: 
  • 1 15.5oz can of garbanzo beans
    • You can also boil beans fresh by soaking them and simmering for about 45 min.
    • Try other kinds of beans too. I've tried white bean, edamame, and a mixture of several beans.
  • Juice of 1 lemon (or about 3 tbl. lemon juice)
  • 2 tbl. sesame tahini
    • This is a ground up paste made from sesame seeds. Berkeley Bowl sells it home-ground!
  • 2 tbl. extra virgin olive oil
  • 1 or 2 garlic cloves (or roasted garlic)
  • 1/2 tsp cumin
  • 1/2 tsp paprika
  • 1/2 tsp parsley (optional)
  • Pinch of salt and pepper
  • Additional water if hummus is too thick
  • Additional optional ingredients which you can add for different flavored hummus:
    • Roasted red peppers
    • Chives
    • Sun-dried tomatoes
Directions:
  • Put all ingredients in a food processor (you can use a blender too, but it will be more difficult to mix) and blend until smooth.
  • Add water if the hummus is too thick.
  • Serve with pita chips, pretzels, or bread for a great appetizer/snack.

Sunday, September 9, 2012

Baked Pasta -Samuel

So I haven't posted in a really long time. Why? I haven't gone grocery shopping in forever and I've just been surviving on potatoes and onions, along with anything that I managed to freeze. A sad, sad life, you must reckon.

Well NO, jokes on you. Here's a recipe with only the basics on hand, along with ingredients that easily last quite a while. You'll also see how easy this recipe is and learn a few things about sauces.

Baked pasta. It's the ultimate comfort food and an excellent addition to any party. The tomatoes in this dish make it just acidic enough for you to keep eating it without feeling like it's too rich or heavy. And it's one of the cheapest and easiest dishes out there to serve large amounts of people.


Baked Pasta
# of servings: 12
Cost: ~$8
Time spent: 1 hour
Ingredients:

  • 1 onion
  • 6-8 strips of bacon
  • 1 bulb garlic (all the cloves)
  • 2 cans chopped tomatoes
  • 1/2 cup red wine
  • 1/2 cup butter
  • 1/2 cup AP flour
  • 3 1/2 cups milk
  • 1 tbsp nutmeg
  • 1 cup cheddar cheese
  • 1 lb (1 box) rotini pasta
  • 1/2 cup mozzarella
  • 1 cup panko bread crumbs
  • 1/4 cup fresh thyme
  • 1/4 cup fresh marjoram
  • 1/2 cup parmesan 
  • 1/4 cup chili flakes (optional)

Directions:
1. (Tomato sauce) Heat the pot on medium-high heat. Mince the onion and slice the bacon about a half inch wide. Add the bacon to the pot without oil and after one minute, add the onion. Grind in pepper and cook until onion is translucent. then add the two cans of tomato and half cup of red wine. Simmer and reduce for 20 minutes.


2. Preheat oven to as high as it goes (or broil, if you can).
(Cheddar roux) Heat another pot with medium-low heat and add the butter. After fully melted, add the flour and quickly whisk all of it until it's a paste. Cook off to neutralize floury flavor but keep whisking or it'll produce lumps. Add 1/4 cup of milk first and whisk to incorporate. Repeat steps until all of milk is used.


3. After all the milk is used, add in the nutmeg and pepper, and then add the cheddar and whisk in. You should have a sauce that just sticks to your whisk. Don't forget that when it cools, it gets even thicker.

At this point, boil a pot of hot water and cook pasta to al dente. Wash it in cold water after because you do not want the pasta to overcook when it goes in the oven.


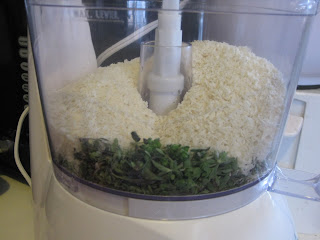
4. Get Japanese panko bread crumbs and herbs in a food processor and process. I chose thyme and marjoram because I didn't want the food crumbs to turn green, but if you want your bread crust green, opt for parsley and rosemary.


5. Mix together your pasta and tomato sauce and cheddar sauce in a rather large container. Add chili flakes if you want it spicy.


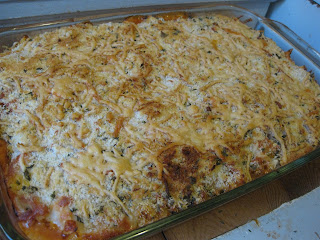
6. Layer pasta with mozzarella, then the bread crumbs, and then another layer of Parmesan on top. It should look something like this:


7. Cook for about 20 minutes or until nice and brown. Let cool slightly and enjoy!